Exporting Data to Excel from PASCO Software
How do I export my data collected in PASCO software to Microsoft Excel?
PASCO Solution for Capstone Software
We have added new Run Selection capabilities with Capstone 2.0!
- Select the File Menu in the upper left
- Select Export Data
- For Capstone 2.0 or higher, select the desired data
- Select "Export to File..."and enter a file name (default is CapstoneData.txt
- Open the file in Excel
The basic steps are the same for Capstone 1.x but you cannot select your desired data: all data runs will be exported. See our PASCO How Do I? video Export Data (Capstone) to see the steps for Capstone 1.x.
PASCO Solution for SPARKvue (Windows/Mac)
- Select the "hamburger" menu in the upper left
- Select "Export Data"
- Name your file (default is ExportedData.csv"
- Select Save
- Open the file in Excel
See our PASCO How Do I? videos Export Data (SPARKvue) for version 4 and earlier versions.
PASCO Solution for SPARKvue (iOS)
For standard sensor (with no GPS sensors)
Once you have collected data and are ready to export:
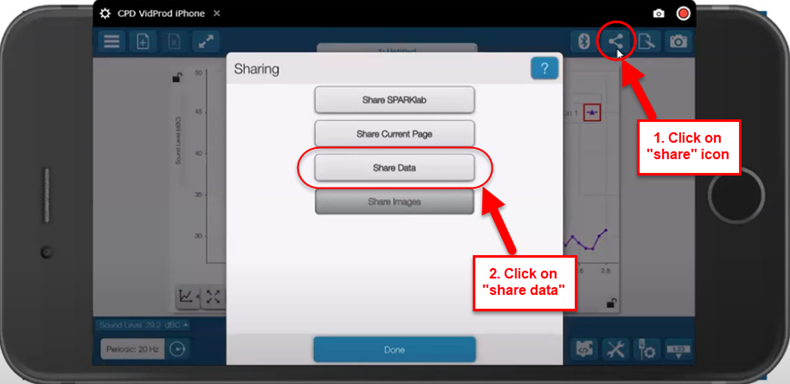
- Click on the “share” icon (which is the 3 dots connected by 2 lines on the top right-hand corner next to the Bluetooth icon), and the sharing window will open.
- Click on the “share data” option, where you will see a list of destinations where the file can be saved.
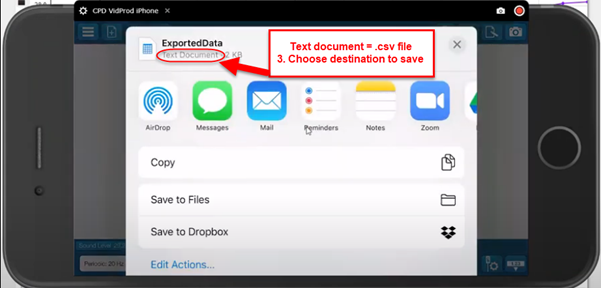
- Make sure that the file type shows as “text document”, which indicates that this is a .csv file that can be opened in either Excel or Google Sheets.
- Rename the file and save it to your desired destination on your phone.
For sensors with integrated wireless GPS sensors
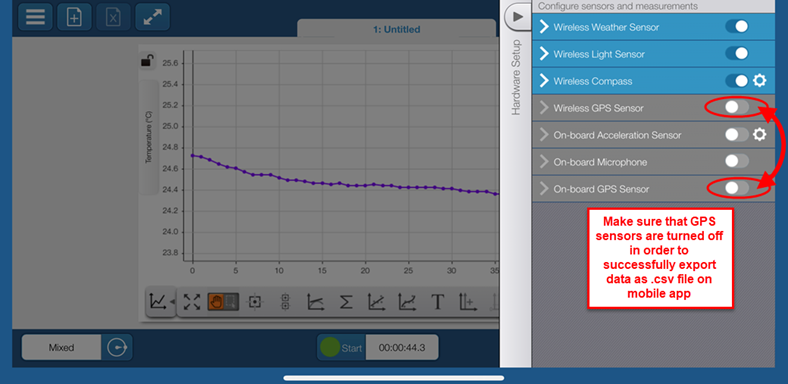
First, you want to make sure that when you are pairing the sensor or go into the hardware settings (icon with the screwdriver/settings wheel on the lower right-hand corner of the screen) that the GPS sensors are turned off if you wish to export your data as a .csv file directly from your mobile device on the mobile app. If you leave them the GPS sensors on, then the data will only be able to export as .kml file on the mobile app (which is useful if you want to open the data in Google Earth...in that case, you will want to keep the GPS sensors on prior to data collection).
*Note: the only GPS sensors that matters for this situation is the "Wireless GPS Sensor" (top arrow on the image below). The On-board GPS sensor should not affect the file type during exporting on mobile app.
Once the wireless GPS sensor is disabled, proceed to collect data and follow the instructions above to export data as a .csv file once you are ready to export your collected data (see instructions in "For standard sensor (with no GPS sensors").
If data has already been collected with the GPS sensors on, then the mobile app/phone will automatically default to trying to save as a .kml file. In that case, if you are unable to or do not wish to collect new data and if your previously collected data was collected with the GPS sensors enabled on your sensor that is connected to your mobile app, then you are not able to export the data as a .csv file on your phone/mobile app directly and will need save the experiment file as a .spklab on your mobile device. This .spkfile can then be sent to a desktop/computer from your mobile device.
To access the data on a desktop/laptop from mobile app:
- Select “share SPARKlab” (option 1) from the “share” icon
- Rename and save the file as a .spklab
- Select a destination to save it on your phone. You could then email this file to yourself or upload it to a drive (ex: OneDrive, Dropbox, Google Drive) using your mobile device. Once sent/uploaded, this file can be opened on a desktop computer or laptop that has SPARKvue.
- Go on a desktop/laptop that has SPARKvue software (free trial links available at https://www.pasco.com/downloads/sparkvue)
- Open the emailed/uploaded .spklab file from your desktop/laptop and download the file
- Open the file in SPARKvue on your desktop/laptop
- Select the "hamburger" menu in the upper left (3 stacked horizontal lines)
- Select "Export Data"
- Name your file (default is ExportedData.csv")
- Select the file type that you wish to save as (drop down menu will show options for both .kml and .csv along with other options)
- Choose a destination for your file on your computer and select "Save"
- Files saved as .csv can be opened in Excel or Google Sheets
PASCO Solution for DataStudio Software
There are two ways to export data to Microsoft Excel from DataStudio.
Copy and paste:
- Go to the Data Window in the upper left of your screen.
- Select the data set that you would like to export.
- Press CTRL+C to copy the data.
- Switch to Microsoft Excel.
- Select the cell where you would like the column of data to start.
- Press CTRL+V.
Export to a file:
- In DataStudio, select File/Export Data.
- Save the file.
- In Excel, select File/Open.
- Choose the file that you saved.
- Select all of the default values in the Excel import wizard. (The file is saved as tab-delimited text).
Related Videos
- Share SPARKlabs and Page Images on iOS (SPARKvue)
- Export Data (SPARKvue)
- Export Data (Capstone)
- Export Data (SPARKvue) (old)
- Export Data Via Copying (Capstone)
For further assistance, please contact Technical Support at support@pasco.com, through chat on this site during our business hours, or through our web form. Tech Support can also be reached by phone at 1-800-772-8700.